

TeknoCerdas.com – Salam cerdas untuk kita semua. Terraform adalah software Infrastructure as Code (IaC) untuk melakukan pembuatan sumber daya di berbagai layanan public cloud. Sebut saja yang paling populer adalah AWS, Azure, Google Cloud, Alibaba dan masih banyak lagi. Tulisan ini akan membahas bagaimana membuat Amazon EC2 Instance dengan Terraform.
Dengan Terraform pengguna dapat melakukan otomasi pembuatan infrastruktur sekaligus melakukan dokumentasi. Hal ini karena secara tidak langsung dengan adanya kode maka semua informasi infrastruktur dapat terlihat dengan jelas. Ditambah dengan dapat diotomasikannya pembuatan infrastruktur maka integrasi dengan CI/CD dapat dilakukan.
Tulisan ini mengasumsikan anda telah menginstal Terraform. Jika belum silahkan download di alamat https://terraform.io/. Diasumsikan versi Terraform yang digunakan adalah Terraform v0.14.
Baca Juga
Hashicorp Terraform 0.14 Telah Dirilis
Sebagai bagian dari best practice maka kita akan menggunakan susunan file seperint berikut untuk melakukan manajamen infrastruktur dengan Terraform.
- my-ec2/
  - main.tf            -> File utama, untuk instances
  - outputs.tf         -> Data yang ditampilkan ketika selesai
  - variables.tf       -> Deklarasi variabel
  - terraform.tfvars   -> Nilai dari variabel
Membuat file variables.tf
File ini berisi konfigurasi yang digunakan pada file utama. Apa yang dideklarasikan lebih kepada hal yang bersifat spesifik ke environment tertentu atau hal-hal yang sering berubah. Misalnya adalah informasi tagging dimana pada environment dev dan prod bisa berbeda.
Hal-hal yang bersifat sensitif seperti credentials juga bisa dideklarasikan disini. Namun ingat bahwa disini adalah deklarasinya saja. Nilai dari variable yang sensitif diletakkan di file terraform.tfvars dan jangan ikut di commit.
Berikut ini adalah konten dari variables.tf.
variable "default_tags" {
  type = map
  default = null
}

variable "ssh_allowed_ips" {
  type = list(string)
  default = null
  description = "Daftar alamat IP yang dapat melakukan ssh ke server"
}

variable "ssh_key_file" {
  type = string
  description = "Nama file dari SSH private key yang digunakan untuk koneksi ke server"
  default = null
}
Membuat file terraform.tfvars
File terraform.tfvars otomatis akan dibaca oleh Terraform. Dari ekstensinya sudah dapat ditebak jika file ini berhubungan dengan variabel. Lebih tepatnya nilai dari variabel.
Variabel yang dideklarasikan pada file variables.tf nilainya kita atur disini.
default_tags = {
  "Env" = "demo"
  "Name" = "my-ec2-demo"
  "FromTerraform" = "true"
}

ssh_key_file = "~/.ssh/id_rsa"

# Masukkan alamat IP dari komputer yang digunakan untuk mengakses server
# Jika ingin memperbolehkan semua IP maka gunakan "0.0.0.0/0"
# Jika lebih dari satu blok IP pisahkan dengan koma
ssh_allowed_ips = ["0.0.0.0/0"]
Membuat file main.tf
Ini adalah file utama yang menyimpan konfigurasi pembuatan server EC2. Setiap item atau sumber daya yang akan dibuat pada sebuah cloud provider dinamakan resource pada Terraform.
$ mkdir my-ec2 && cd my-ec2Selanjutnya buat sebuah file pada direktori tersebut dengan nama main.tf. File ini berisi konfigurasi Terraform untuk membuat server EC2.
# Provider yang digunakan adalah AWS
# Versi dikunci pada 3.22.x
terraform {
  required_providers {
    aws = {
      source  = "hashicorp/aws"
      version = "~> 3.22.0"
    }
  }
}

provider "aws" {
  region = "ap-southeast-1"
  profile = "teknocerdas-infra" # Ganti dengan profile AWS CLI profile anda
}

# Ambil data VPC yang memiliki attribute default = true
data "aws_vpc" "demo" {
  default = true
}

# Ambil data AMI untuk Ubuntu Server 20.04 LTS
data "aws_ami" "demo_ami" {
  most_recent = true

  filter {
    name   = "name"
    values = ["ubuntu/images/hvm-ssd/ubuntu-focal-20.04-amd64-server-*"]
  }

  filter {
    name   = "virtualization-type"
    values = ["hvm"]
  }

  owners = ["099720109477"] # Canonical
}

# Buat sebuah SSH Key pair baru yang akan digunakan untuk SSH login
resource "aws_key_pair" "demo-ssh" {
  key_name = "my-demo-key"
  public_key = chomp(file(var.ssh_key_file))
}

# Security group. Hanya buka port 22 SSH.
resource "aws_security_group" "demo" {
  name = "my-demo-firewall"
  name_prefix = null
  description = "Firewall for Demo"

  ingress {
    description = "SSH"
    from_port   = 22
    to_port     = 22
    protocol    = "tcp"
    # Allowed IPs ambil dari variabel yang sudah dibuat sebelumnya.
    cidr_blocks = var.ssh_allowed_ips
  }

  egress {
    description = "Allow ouput for all"
    from_port   = 0
    to_port     = 0
    protocol    = "-1" # All
    cidr_blocks = ["0.0.0.0/0"]
  }

  vpc_id = data.aws_vpc.demo.id
  tags = var.default_tags
}

resource "aws_instance" "demo" {
  ami = data.aws_ami.demo_ami.id
  instance_type = var.ec2.type
  key_name = "my-demo-key"
  availability_zone = var.ec2.az

  tags = var.default_tags
  volume_tags = var.default_tags
  vpc_security_group_ids = [aws_security_group.demo.id]

  # Ukuran dari storage
  root_block_device {
    volume_type = "gp3"
    volume_size = 32
    delete_on_termination = true
    encrypted = false
  }
}
Dalam konfigurasi diatas resource utama adalah aws_instance dimana ini adalah blok untuk membuat server EC2. Pada konfigurasi tersebut digunakan tipe instance t2.micro yang nilainya diambil dari variabel ec2.type yang dibuat pada file variables.tf dan terraform.tfvars.
Terdapat juga resource aws_security_group dimana ini adalah blok untuk mengatur Security Group untuk EC2 yang dibuat. Port yang diperbolehkan pada contoh ini adalah port 22 atau SSH. Dan alamat IP yang diperbolehkan konek ke server diambil dari variabel ssh_allowed_ips.
Satu hal lagi adalah blok provider dimana kita tentukan nama AWS CLI profile dan region yang digunakan.
Membuat file outputs.tf
File ini berisi data yang akan ditampilkan ketika Terraform selesai melakukan provisioning server atau infrastruktur. Dalam contoh ini akan ditampilkan perintah SSH untuk koneksi dan publik IP dari EC2.
output "endpoints" {
  value = {
    ssh_access = "ssh ubuntu@${aws_instance.demo.public_ip}"
    public_ip = aws_instance.demo.public_ip
    public_dns = aws_instance.demo.public_dns
  }
}
Menjalankan Terraform
Terdapat tiga perintah yang sering dijalankan ketika menggunakan Terraform yaitu:
terraform planuntuk mengetahui resource apa saja yang akan dibuat.terraform applyuntuk melakukan provisioning atau pembuatan resource pada cloud provider.terraform destroyunutk menghapus semua resource yang telah dibuat sebelumnya.
Untuk langkah awal kita Terraform harus mengetahui dulu provider yang harus digunakan dan mendownloadnya jika diperlukan. Untuk itu diperlukan inisialisasi awal dengan perintah init. Pastikan berada pada direktori kerja project ini.
$ terraform initInitializing the backend...
Initializing provider plugins...
- Finding hashicorp/aws versions matching "~> 3.22.0"...
- Installing hashicorp/aws v3.22.0...
- Installed hashicorp/aws v3.22.0 (unauthenticated)
Terraform has created a lock file .terraform.lock.hcl to record the provider
selections it made above. Include this file in your version control repository
so that Terraform can guarantee to make the same selections by default when
you run "terraform init" in the future.
Terraform has been successfully initialized!
You may now begin working with Terraform. Try running "terraform plan" to see
any changes that are required for your infrastructure. All Terraform commands
should now work.
If you ever set or change modules or backend configuration for Terraform,
rerun this command to reinitialize your working directory. If you forget, other
commands will detect it and remind you to do so if necessary.Berikutnya adalah melakukan analisa resource yang akan dibuat terlebih dahulu dengan plan.
$ terraform planAn execution plan has been generated and is shown below.
Resource actions are indicated with the following symbols:
+ create
Terraform will perform the following actions:
# aws_instance.demo will be created
+ resource "aws_instance" "demo" {
+ ami = "ami-03425fe81e8a82dfb"
+ arn = (known after apply)
+ associate_public_ip_address = (known after apply)
+ availability_zone = "ap-southeast-1a"
+ cpu_core_count = (known after apply)
+ cpu_threads_per_core = (known after apply)
+ get_password_data = false
+ host_id = (known after apply)
+ id = (known after apply)
+ instance_state = (known after apply)
+ instance_type = "t2.micro"
+ ipv6_address_count = (known after apply)
+ ipv6_addresses = (known after apply)
+ key_name = "my-demo-key"
+ outpost_arn = (known after apply)
+ password_data = (known after apply)
+ placement_group = (known after apply)
+ primary_network_interface_id = (known after apply)
+ private_dns = (known after apply)
+ private_ip = (known after apply)
+ public_dns = (known after apply)
+ public_ip = (known after apply)
+ secondary_private_ips = (known after apply)
+ security_groups = (known after apply)
+ source_dest_check = true
+ subnet_id = (known after apply)
+ tags = {
+ "Env" = "demo"
+ "FromTerraform" = "true"
+ "Name" = "my-ec2-demo"
}
+ tenancy = (known after apply)
+ volume_tags = {
+ "Env" = "demo"
+ "FromTerraform" = "true"
+ "Name" = "my-ec2-demo"
}
+ vpc_security_group_ids = (known after apply)
+ ebs_block_device {
+ delete_on_termination = (known after apply)
+ device_name = (known after apply)
+ encrypted = (known after apply)
+ iops = (known after apply)
+ kms_key_id = (known after apply)
+ snapshot_id = (known after apply)
+ throughput = (known after apply)
+ volume_id = (known after apply)
+ volume_size = (known after apply)
+ volume_type = (known after apply)
}
+ enclave_options {
+ enabled = (known after apply)
}
+ ephemeral_block_device {
+ device_name = (known after apply)
+ no_device = (known after apply)
+ virtual_name = (known after apply)
}
+ metadata_options {
+ http_endpoint = (known after apply)
+ http_put_response_hop_limit = (known after apply)
+ http_tokens = (known after apply)
}
+ network_interface {
+ delete_on_termination = (known after apply)
+ device_index = (known after apply)
+ network_interface_id = (known after apply)
}
+ root_block_device {
+ delete_on_termination = true
+ device_name = (known after apply)
+ encrypted = false
+ iops = (known after apply)
+ kms_key_id = (known after apply)
+ throughput = (known after apply)
+ volume_id = (known after apply)
+ volume_size = 32
+ volume_type = "gp3"
}
}
# aws_key_pair.demo-ssh will be created
+ resource "aws_key_pair" "demo-ssh" {
+ arn = (known after apply)
+ fingerprint = (known after apply)
+ id = (known after apply)
+ key_name = "my-demo-key"
+ key_pair_id = (known after apply)
+ public_key = "ssh-rsa [...CUT...]"
}
# aws_security_group.demo will be created
+ resource "aws_security_group" "demo" {
+ arn = (known after apply)
+ description = "Firewall for Demo"
+ egress = [
+ {
+ cidr_blocks = [
+ "0.0.0.0/0",
]
+ description = "Allow ouput for all"
+ from_port = 0
+ ipv6_cidr_blocks = []
+ prefix_list_ids = []
+ protocol = "-1"
+ security_groups = []
+ self = false
+ to_port = 0
},
]
+ id = (known after apply)
+ ingress = [
+ {
+ cidr_blocks = [
+ "0.0.0.0/0",
]
+ description = "SSH"
+ from_port = 22
+ ipv6_cidr_blocks = []
+ prefix_list_ids = []
+ protocol = "tcp"
+ security_groups = []
+ self = false
+ to_port = 22
},
]
+ name = "my-demo-firewall"
+ owner_id = (known after apply)
+ revoke_rules_on_delete = false
+ tags = {
+ "Env" = "demo"
+ "FromTerraform" = "true"
+ "Name" = "my-ec2-demo"
}
+ vpc_id = "vpc-6adcd80e"
}
Plan: 3 to add, 0 to change, 0 to destroy.
------------------------------------------------------------------------
Note: You didn't specify an "-out" parameter to save this plan, so Terraform
can't guarantee that exactly these actions will be performed if
"terraform apply" is subsequently run.Dapat terlihat apa saja yang akan dibuat oleh Terraform ketika nanti perintah apply digunakan. Ringkasan apa yang akan terjadi dapat dilihat pada baris:
Plan: 3 to add, 0 to change, 0 to destroy.Baris diatas berarti akan ada 3 resource yang dibuat dalam hal ini adalah 1 EC2 server, 1 Security Group dan 1 SSH Key pair.
Jika kita sudah yakin bahwa semuanya benar maka jalankan perintah apply untuk melakukan provision infrastruktur. Perintah apply mirip dengan plan hanya saja akan ada konfirmasi untuk mengetikkan “yes” agar Terraform melakukan provisioning.
$ terraform apply[...CUT...]
Plan: 3 to add, 0 to change, 0 to destroy.
Do you want to perform these actions?
Terraform will perform the actions described above.
Only 'yes' will be accepted to approve.
Enter a value: yes
aws_security_group.demo: Creating...
aws_key_pair.demo-ssh: Creating...
aws_key_pair.demo-ssh: Creation complete after 0s [id=my-demo-key]
aws_security_group.demo: Creation complete after 2s [id=sg-06768f07232b85e36]
aws_instance.demo: Creating...
aws_instance.demo: Still creating... [10s elapsed]
aws_instance.demo: Still creating... [20s elapsed]
aws_instance.demo: Creation complete after 24s [id=i-088e9baf1b08eff71]
Apply complete! Resources: 3 added, 0 changed, 0 destroyed.
Outputs:
endpoints = {
"public_dns" = "ec2-52-77-240-175.ap-southeast-1.compute.amazonaws.com"
"public_ip" = "52.77.240.175"
"ssh_access" = "ssh ubuntu@52.77.240.175"
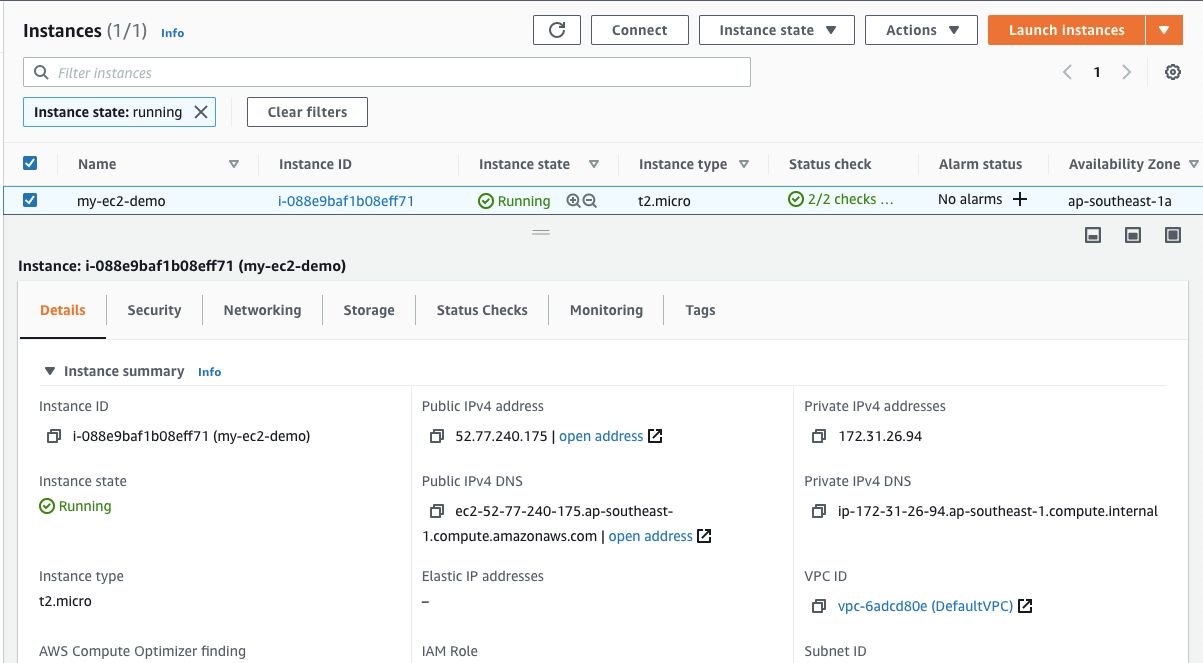
}Ketikkan yes lalu ENTER. Dapat terlihat Terraform membuat beberapa resource dan ringkasan hasilnya ditampilkan dibagian paling bawah. Dimana terdapat 3 resource yang berhasil dibuat.
Konfigurasi yang kita tulis pada outputs.tf berfungsi disini. Dimana ditampilkan beberapa informasi yaitu endpoint untuk ssh, public_dns, dan public_ip.
Selanjutnya coba masuk lewat SSH ke instance tersebut untuk mengetes konfigurasi Security Group.
$ insecure-ssh ubuntu@52.77.240.175Warning: Permanently added '52.77.240.175' (ECDSA) to the list of known hosts.
Welcome to Ubuntu 20.04.1 LTS (GNU/Linux 5.4.0-1035-aws x86_64)
* Documentation: https://help.ubuntu.com
* Management: https://landscape.canonical.com
* Support: https://ubuntu.com/advantage
System information as of Mon Jan 11 04:05:12 UTC 2021
System load: 0.0 Processes: 100
Usage of /: 4.0% of 30.96GB Users logged in: 0
Memory usage: 21% IPv4 address for eth0: 172.31.26.94
Swap usage: 0%
* Introducing self-healing high availability clusters in MicroK8s.
Simple, hardened, Kubernetes for production, from RaspberryPi to DC.
https://microk8s.io/high-availability
1 update can be installed immediately.
0 of these updates are security updates.
To see these additional updates run: apt list --upgradable
The programs included with the Ubuntu system are free software;
the exact distribution terms for each program are described in the
individual files in /usr/share/doc/*/copyright.
Ubuntu comes with ABSOLUTELY NO WARRANTY, to the extent permitted by
applicable law.
To run a command as administrator (user "root"), use "sudo ".
See "man sudo_root" for details.
ubuntu@ip-172-31-26-94:~$ SSH berhasil dijalankan dan kita dapat masuk ke server EC2.
Menghapus Infrastruktur dengan Terraform
Jika kita membuat infrastruktur dengan cara manual melalui Console maka kita harus masuk satu-per-satu ke halaman setiap resource yang ingin dihapus agar tidak meninggalkan jejak billing yang terus berjalan.
Dengan tools seperti Terraform hal itu tidak perlu dilakukan. Cukup dengan satu kali perintah maka infrastruktur yang dibuat sebelumnya akan dihapus.
$ terraform destroy[...CUT...]
Plan: 0 to add, 0 to change, 3 to destroy.
Changes to Outputs:
- endpoints = {
- public_dns = "ec2-52-77-240-175.ap-southeast-1.compute.amazonaws.com"
- public_ip = "52.77.240.175"
- ssh_access = "ssh ubuntu@52.77.240.175"
} -> null
Do you really want to destroy all resources?
Terraform will destroy all your managed infrastructure, as shown above.
There is no undo. Only 'yes' will be accepted to confirm.
Enter a value:Perintah diatas akan menampilkan resource apa saja yang akan dihapus, kemudian kita harus mengkonfirmasi dengan mengetik “yes” untuk benar-benar melakukan penghapusan. Dapat terlihat bahwa resource yang akan dihapus adalah 3 resource, sesuai dengan resource yang dibuat pada proses sebelumnya.
Ketik “yes” lalu enter untuk melanjutkan.
aws_key_pair.demo-ssh: Destroying... [id=my-demo-key]
aws_instance.demo: Destroying... [id=i-088e9baf1b08eff71]
aws_key_pair.demo-ssh: Destruction complete after 0s
aws_instance.demo: Still destroying... [id=i-088e9baf1b08eff71, 10s elapsed]
aws_instance.demo: Still destroying... [id=i-088e9baf1b08eff71, 20s elapsed]
aws_instance.demo: Still destroying... [id=i-088e9baf1b08eff71, 30s elapsed]
aws_instance.demo: Destruction complete after 31s
aws_security_group.demo: Destroying... [id=sg-06768f07232b85e36]
aws_security_group.demo: Destruction complete after 1s

Destroy complete! Resources: 3 destroyed.